Send and e-mail alert if server is down
In this article, we show you how you can build a system that will send an e-mail alert in case of server error. It will monitor the server by sending it response request. If the server is not responding, it means that it is not active. Having a server error detection system will make error handling easier and down-time significantly less. Providing your customers with reliable service means more customer satisfaction which will result in more customers later. The solution will only take about 15 minutes to build, and it requires no previous knowledge of the subject. The solution is built on the Ozeki Alarm System which is an on-premises high speed solution for monitoring any connection. It can send notifications to e-mail, SMS, scripted call or even chat message. To start monitoring your servers all the time, Download the Ozeki SMS Gateway.
How to send and e-mail alert if server is down (Short directions)
To send and e-mail alert if server is down (Short directions)
- Add a new alarm source
- Configure the alarm source
- Turn on server monitoring
- Add a new email client channel
- Select SMTP client
- Configure the client
- Provide a recipient address
- Add a new route
- Check the logs
Send and e-mail alert if server is down (Video tutorial)
This video is about how to setup an e-mail alert system that will notify you if your server is down. The video will start with adding a new alarm source and will take you to your first successful notify e-mail. The video is only 2:53 long and it contains all the necessary steps you need to take to have the server monitoring system. In the video, we are going to use the Ozeki Alarm System. It is a versatile and high performing alarm system that can check various sources for failure and can send error notifications to multiple sources. It can send e-mail, SMS, chat or even scripted phone calls. You will see how to setup a server ping setup, how to setup and online connection and how to create a route between them. Watch this video carefully any you will have no problem with recreating the setup yourself.
How to setup a Mobile ping monitoring system that sends e-mail
This network monitoring setup makes it possible to send error notification e-mails using a mobile monitoring station. This solution consist of a network that needs monitoring, a mobile phone that is running the Ozeki Alarm System and an inbox that will receive the notification e-mail. The system works the following way: the Ozeki Alarm System will periodically check the network by sending response request to the network. If the network is not responding, it will send a notification e-mail to your inbox.

How to setup a PC ping monitoring system that sends e-mail
This network monitoring setup will periodically check you network if it is live or not. If it found an error, an e-mail message will be sent to a predefined e-mail address. This solution consists of a network that needs to be checking, a monitoring PC that runs the Ozeki Alarm System and an e-mail inbox that will receive your e-mail messages. To make the system easily understandable, the monitoring PC will send a respond request to the selected network. If the server is not responding, it means that it is not active and the Ozeki Alarm System will send a notification e-mail to a selected e-mail address.

Add a new alarm source
The first thing you need to do is to install a new alarm source. To do so, open the Ozeki Alarm System and search for ‘Sources’ in the toolbar (Figure 1). As you can see, there is the list of all the alarm sources that the Ozeki Alarm System can work with. In this case, we want to have a system that send the server a response request. If the server is not responding, it means that it is not active. Search for the Ping offline option and click the blue ‘Install’ button to proceed to the next step.

Configure the alarm source
In this following step, you need to configure the pingoffline alarm source. As you can see on Figure 4, there are two groupboxes that you need to fill in. The first is the ‘Server’ groupbox, the other on is the ‘Frequency’ groupbox. The server input filed needs the IP address or the hostname of the server that needs to be monitored. The period input filed requires a number. This number will tell how many minutes will be passing between two pings. After you have provided the necessary information, press the ‘Ok’ button to proceed.

Turn on the alarm source
Now that you have the alar source ready to use, you need to turn it on. You can do this by finding the ‘Connection’ switch button that is located in the ‘Connection’ groupbox in the alarm sources data sheet (Figure 5). Click the switch button to enable the connection. You can see that the alarm source is connecting to the server in the details panel. You will see real time information about the connecting process. Now you have the server monitored. All you need to do is to setup a system that sends e-mail notifications using the created alarm source. Proceed to the next step to do so.

Add a e-mail new client
To have a channel that you can use to send e-mails with, open the ‘install notification channel’ page. You can do this by clicking the ‘Channels’ button located in the toolbar of the Alarm System. By clicking the button, you will visit a page, visible on Figure 6, where you can select which type of notification channel you wish to create. In this case, we want the channel to send e-mail messages. Choose the ‘E-mail client connection’ option by clicking the blue ‘Install’ button. Clicking it will start the installation process of the new notification channel. As the first step, you will need to choose the type of e-mail client.

Select the SMTP client
In this step, you need to choose the type of e-mail client you wish to use when connecting to an e-mail server. In our case, we want to send e-mail messages to any recipient but we don’t need to download any messages from e-mail servers. The best option to choose here is the ‘SMTP client’. It will use the Simple Mail Transfer Protocol to send messages to even multiple recipients. Find the ‘SMTP client’ option and click the blue ‘Install’ button to start the installation process (Figure 7).

Configure the SMTP server
To have a working SMTP client connection, you need to configure it. On Figure 8, you can see how the configuration window looks like. You will need to provide a ‘Host’ IP address, that you can test instantly to see if it is working. The SMTP connection needs a port to work. Provide the port number using the ‘Port’ input field. For the most secure communication, you need to provide the username and the password for the SMTP server. If you have provided all the necessary information, click the ‘Ok’ button to proceed to the next step.

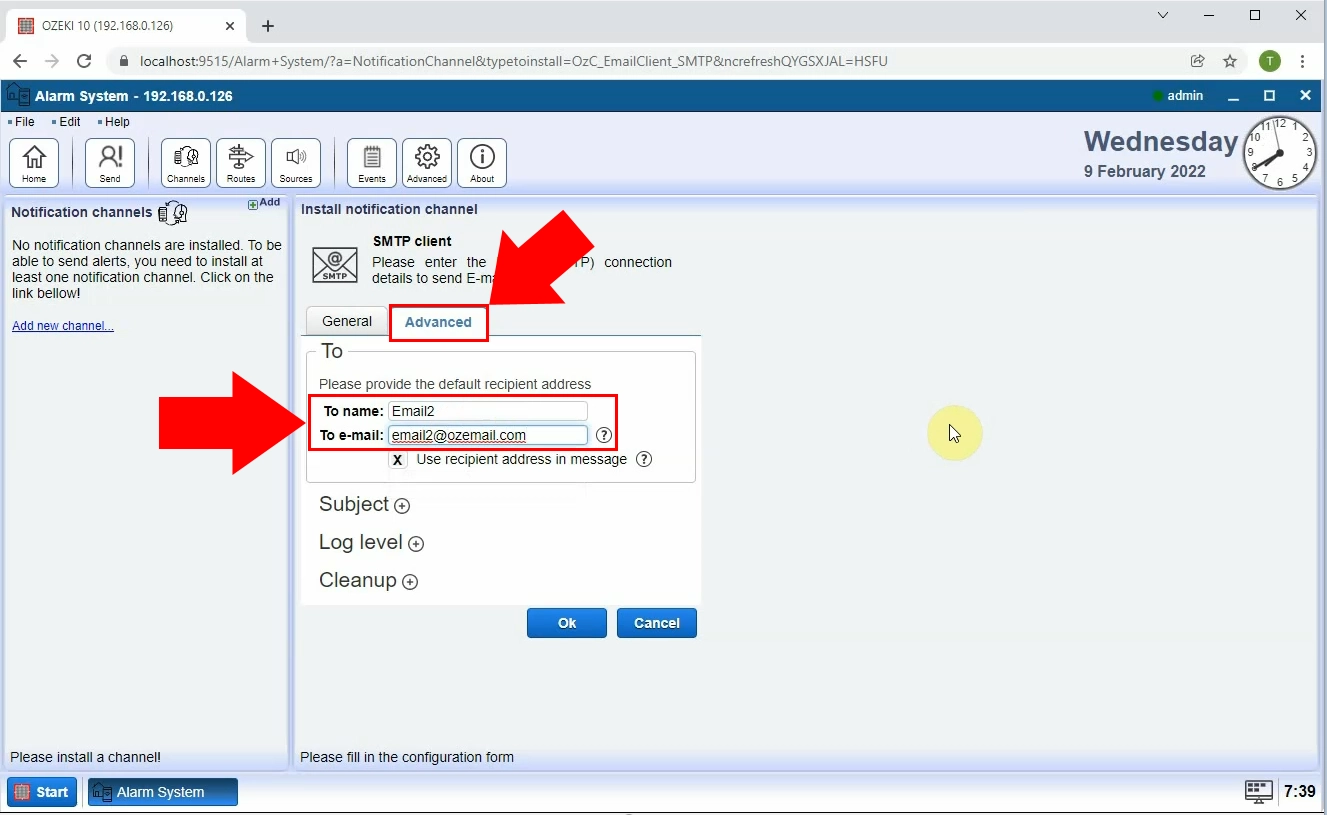
Add the recipint address
Now you get to provide the default recipient address. At the top of the new SMTP client creating panel, you can see two tabs. Click the ‘Advanced’ one. You will find the ‘To’ groupbox there. In the ‘To name’ textbox, provide a name for the recipient that you will use for identification. Below that, you can find the ‘e-mail address’ input field (Figure 9). There you can set the e-mail address of the recipient where the message should be sent. This was the last step of setting up the notification channel. Now all you need to do is to connect the notification channel and the alarm source. Proceed to the next step to start setting up a new route.
Create a new route
You need to have a channel between the notification channel and the alarm source. A route serves as a channel that forwards information from the alarm source to the notification channel. You can start creating a new route by visiting the list of existing routes using the routes button in the toolbar of the Alarm System. Right under the Routes button, you can see a blue ‘Create new Route’ button. Click it to start configuring the new route. In the ‘Settings’ groupbox, you can see two input fields. One is for the connection that sends the message, and the other is for the connection the receives it. Provide the alarm source in the ‘From’ input field. Select the ‘SMTP connection’ address for the ‘To’ field. If you have done it all, click the ‘Ok’ button to proceed (Figure 10).

Check the log
Now you have the system ready to use. To supervise the system in real time, use the ‘Events’ tab. There you can see the log of the connection. You can see all the happenings on the connection in real time The most importantly, you can see the ping that is sent to the monitored server. This will make error correction easier and faster (Figure 11).

Check the sent e-mail
If the server goes down, the recipient will receive a notification e-mail. You can see an example of the notification e-mail on Figure 12. The e-mail will contain the IP address of the server and the time when the ping detected the error in the server. The sender of the e-mail will be the alarm system, if you would like to search for all the notifications.

Summary
This article explained how to setup a system that is capable of monitoring your servers and sending notifies in case of an error. Having this system will grant you more control of your server simply due to getting a notification when it is down. This will result in a more stable system and more customer satisfaction. Which will make more customers in long time.
To use the full potential of the Ozeki Alarm System, make sure to visit the Ozeki webpage where you will find more articles about the technology. For example visit the Webserver down e-mail article or the Webserver down SMS article.
The last thing you need to do is to download the Ozeki Alarm System and start developing your own solutions.